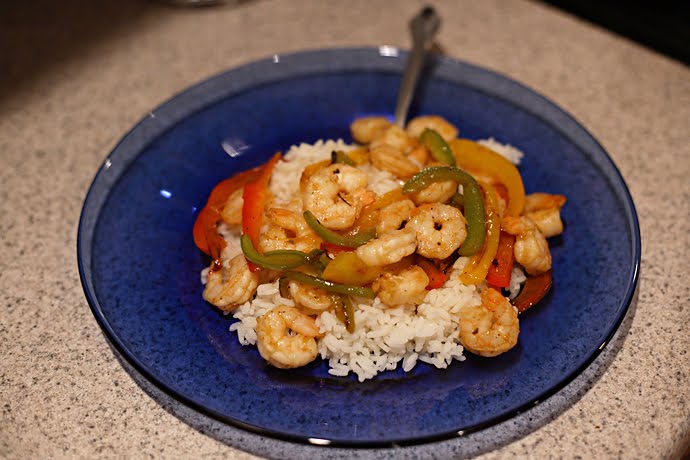
Margarita Shrimp Stir-Fry
chef and photography:
Miranda Wampler
If you're looking to escape this early summer heat and enjoy fresh garden vegetables, my daughter came across a delicious new way to enjoy shrimp using frozen margarita mix.
1 can frozen (thawed) Margarita mix
2 tablespoons Mrs Dash Fiesta Lime Seasoning
(1 teaspoon red pepper flakes for a spicier taste)
1 lb uncooked peeled deveined medium shrimp, thawed if frozen, tail shells removed
2 tablespoon butter or margarine
1 medium green bell pepper cut into strips or julienned
1 medium yellow bell pepper cut into strips
1 medium red bell pepper cut into strips
1 tablespoon finely chopped cilantro
1 cup uncooked instant white rice
1 cup water
In a small bowl, stir margarita mix and fiesta lime seasoning. Reserve 2 tablespoons mixture. Add shrimp to remaining mixture; toss to coat. Cover and refrigerate 30 minutes.
In 10-inch non-stick skillet, melt butter over medium-high heat. Cook bell peppers 2-4 minutes, stirring occasionally until tender-crisp.
Remove shrimp from marinade; discard marinade. Stir shrimp into skillet mixture. Cook 2 minutes, stirring occasionally, until shrimp are pink and firm. Stir in reserved 2 tablespoons of sauce and add the cilantro. Cook until heated through.
Meanwhile, cook rice and water as directed on package. Serve stir-fry over rice.

If you happened to pick up 2 cans of frozen Margarita mix, you might want to blend a couple of refreshing frozen drinks to have with dinner or enjoy afterward in the summer night air.
This is http://www.giftweblog.com/cgi-bin/to.cgi?l=hamm The Bartender's Frozen Margarita Maker. It's wonderful for making yummy frozen drinks!!!
Enjoy!
Margarita Shrimp Stir-Fry
Thursday, June 17, 2010 on Thursday, June 17, 2010Leftover Burger
Monday, May 24, 2010 on Monday, May 24, 2010
Yes, I said leftover burger! I would be willing to bet there are a lot of you for one reason or another that end up with some leftover ground beef. We grilled out this weekend and for the 999th time, I ended up with too much ground beef. Not to fear, it usually ends up as extra burgers for lunch the next day or goes into spaghetti sauce. But today I was hankerin' for a homemade meatball sub.
This quick and simple recipe for mom's meatballs will work for my favorite meatball sub as well as a number of other dishes. You can also double the recipe and freeze them for later use.
Prep Time: 15 minutes
Cook Time: 30 minutes
Total Time: 45 minutes
Ingredients:
* 1 lb. lean ground beef
* 1 egg
* 2 Tbsp. milk (or water if you are lactose intolerant)
* 1/2 cup bread crumbs
* 1/2 cup minced onion
* 2 Tbsp. Worcestershire Sauce
* 1/2 tsp. salt
* 1/8 tsp. pepper
(I use Morton's Nature's Seasons Seasoning Blend instead of salt and pepper because it also gives it that wonderful garlic flavor.)
Preparation:
Preheat oven to 350 degrees. In large bowl combine egg, water, bread crumbs, onion, salt and pepper and combine. Add ground beef, broken into chunks, and mush with your hands to combine. Form into meatballs about 1" in diameter and place on a broiler pan. (A 13" x 9" baking dish will do as well.) Bake at 350 degrees for 25-30 minutes until meatballs are no longer pink in center. Cool and freeze, or when baked, use in your favorite recipe.
To finish this wonderful and easy meatball sub recipe I just picked up a jar of Ragu pizza sauce, a pack of sliced mozzarella, and some sub buns at the local grocery store. And voila!
I also had some leftover macaroni salad. Pasta salad would be great with this too. Simple Italian Meatball Sub and pasta dish! Mmmm...
Homemade Blackberry Jam
Thursday, August 07, 2008 on Thursday, August 07, 2008
This blog entry is brought to you in part by Miranda Wampler. haha Sorry, I've wanted to say that for a while. But seriously, I am guest-blogging today on behalf of my mom.
Yesterday we made super yummy blackberry jam. And when I say "we", I mean that my mom made it and I stood around (in the way) and took pictures. Hey, someone's gotta document it, right? I'm sayin.

In my own words, I will give you step-by-step instructions on how to make your own yummy blackberry jam (the yummy part is optional). Think of it as a "Jam for Dummies". Not that you're a dummy in any way. ;)
And now (in my best 'The Price is Right' model pose) I present to you to the easy peasy recipe:
Step-by-step with photos
1. Sterilize the jars. You can either boil them in a pot of water or wash them in the dishwasher. We opted for the dishwasher... A lot easier.

2. Get all your jam crap together. Totally not crap, but it's a mess of stuff. Jars, lids, fruit pectin, etc.

3. Measure the berries. Our recipe calls for 80 oz. (9 cups) of whole blackberries.

4. Pour all of your berries in to a large pot and set aside.

5. Measure out 7 cups of sugar and set aside.

6. Boil the berries and mash until juicy. Stir continuously until they won't boil down.

7. Stir in the fruit pectin

8. Pour in all of the sugar

9. Keep the seals and lids in extremely hot water (not boiling) until ready to use.

10. To test your jam, place a metal spoon in ice cold water. If the jam gels on the spoon, you've done well. If not, you might want to add a tad more pectin to your berry mixture.

11. Be sure to have all of your canning tools ready. This cute little kit can be found at most WalMart stores.

12. Fill each jar leaving half inch space at the top.

13. After tightening the lids, place the jars in boiling water for 10 minutes to properly seal.

14. Make sure there is at least an inch or two water covering the top of the lids.

15. Remove the pot lid and let sit for 5 minutes. Take out each jar and wipe it down.

Wait 12-24 hours and enjoy!

Mini Peach Sweet Biscuits by Miranda
Tuesday, July 29, 2008 on Tuesday, July 29, 2008
This recipe comes from my daughter, Miranda. She made these for us as a late snack last night.
Makes: 12 biscuits
Overall time: 20 minutes
What you'll need:
4 peach fruit cups (drained)
2 cans mini biscuits
1/3 cup sugar
1 muffin pan

This recipe is very short and sweet.
1. Preheat the oven to somewhere between 375° and 400°F (depending on how hot your oven cooks).
2. Bring the peaches and sugar to a boil in medium sauce pan. Remove from heat.
3. In a medium size bowl, lightly mash the peaches. Try to keep some big chunks in there.
4. Grease your muffin pan and place one mini biscuit in the bottom of each.

5. Add a layer of the peaches on top of the biscuit.

6. Top the peaches with another biscuit layer.


7. Bake for 10-12 minutes.

8. Remove from oven, sprinkle the top with a little extra sugar (brown) and serve with your favorite ice cream. Yum! You can even serve with nuts or cinnamon.

Dinner by Mom
Tuesday, July 29, 2008 on Tuesday, July 29, 2008 The above title was taken from my daughter, Mira's Flickr site. By now everyone should know she wears her camera around her neck 24/7. So it didn't surprise me when I found my pasta on the internet.
Now don't get too excited. The recipe is so easy my dog could make it..... well, close.
Since the garden has been booming this past month, we have been eating a lot of dishes based on these wonderfully colored veggies. I have had a sore throat and the sniffles all day......due in part to the fact that I rode my 4-wheeler in the rain Saturday night, but...... life goes on. So, I opted for a short cut dinner.
Italian Herb, Zucchini, Squash, and Tomato Pasta
* 2 medium garden sized squash
* 1 large garden zucchini
* 1 medium garden red tomato
* 1 medium garden banana pepper
* 1/2 bottle Zesty Italian Dressing
* Black pepper to taste
* Fettuccini noodles (serving for 4)
* Dash of olive oil
Set water to boil for the pasta with a dash of olive oil.
Rinse and slice up the garden veggies to your liking and place in sauce pan heated to medium. Pour 1/2 bottle of Italian Dressing onto veggies and cover. Reduce heat and let simmer for 15 minutes. Remove cover and add black pepper to taste. Fettuccini noodles should be ready for the colander. Combine and commence eating. Yum!
Oh. We did add garlic bread to the menu as an afterthought. Super Yum!
I just took two Tylenol and I'm heading to bed. Tomorrow is always a better day.
G'night!
'Fire'day Night Lights
Friday, July 18, 2008 on Friday, July 18, 2008
As much as I love to eat, sometimes the preparation and cook times can be a little long on Southern foods, so I opted for a quick and easy method for grilling this evening. This is my quick and easy recipe for:
Italian Chicken and Veggie Kabobs
* 2 lbs. chicken tenders or breasts cut into strips
* 2 -8 oz. packages of portobello mushrooms
* 2 medium sized yellow squash
* 1 large zucchini
* 2 bell peppers (We chose orange and yellow to add color)
* 1 bottle of Zesty Italian dressing
* 1 dozen wooden skewers soaked in water (or metal if you have them)
* Basting brush
Pre-heat grill to medium heat.
Rinse the chicken and place in shallow dish. Add half bottle Italian dressing and let marinate in fridge for 15 minutes while cutting the veggies.
Rinse all veggies. Slice squash and zucchini into round, bite-sized pieces. Core and discard seeds of bell peppers and slice into nice sized pieces. Mushrooms remain whole with stems. Place veggies in any order on skewers for a beautiful colorful display or how you like. Baste each veggie skewer with the Italian dressing.


Place skewers and chicken on the pre-heated grill. You may also place the basted zucchini directly on grill as we did. Cook time about 8 minutes on each side of chicken while continuing to roll the skewers. Continue to baste the veggies and the chicken while it is on the grill for a perfect juicy taste.


After dinner, the evening air temp was around 65 degrees. Not too warm or too cool, so we decided to use our fire pit. I enjoyed the fire with a nice glass of wine. My husband, of course, with his cold brew. And my daughter played with her camera....... nothing new there.

The ghost is coming to get Kent.

Waiting for the fire to calm down a bit before getting comfy.

We love Friday Night "fire pit" night!
Apples and Jack Daniels. Yeehaw!
Wednesday, July 09, 2008 on Wednesday, July 09, 2008

Jack Daniels Walnut Apple Cobbler
- 8-10 fresh sliced June Apples with the peel
- 1/3 cup brown sugar
- 1 tablespoon butter
- 2 tablespoons water
- 1/2 cup coarsely chopped walnuts
- 1/2 teaspoon cinnamon
- 2 heaping tablespoons of bourbon - we prefer Jack Daniels
cooking apple from your local grocer, but be sure to cut the quantity.


Combine apples, water, and butter is a saucepan. Bring to a boil. Cover and reduce heat and let simmer for 10 minutes. Mash slightly if pieces are large. Add brown sugar, walnuts, cinnamon, and Jack Daniels. Stir until sugar dissolves. Remove from heat and set aside.

- 1 cup self-rising flour or Bisquick
- 1 cup sugar
- 1 cup milk
Combine these three ingredients in large bowl and set aside as well.
Melt 1/3 cup butter in your 9" round cobbler dish or 8" x 8" square pyrex. Add the apple mixture. Pour the batter on top. Do not stir. Place in a pre-heated 350 degree oven for 30 minutes or until lightly browned on top.


Optional: You can sprinkle brown sugar and cinnamon on the cobbler while it is still piping hot. This will crystallize as the sugar melts.

Serve with your favorite ice cream. Our choice today was French Vanilla. Ah! So delish!


